
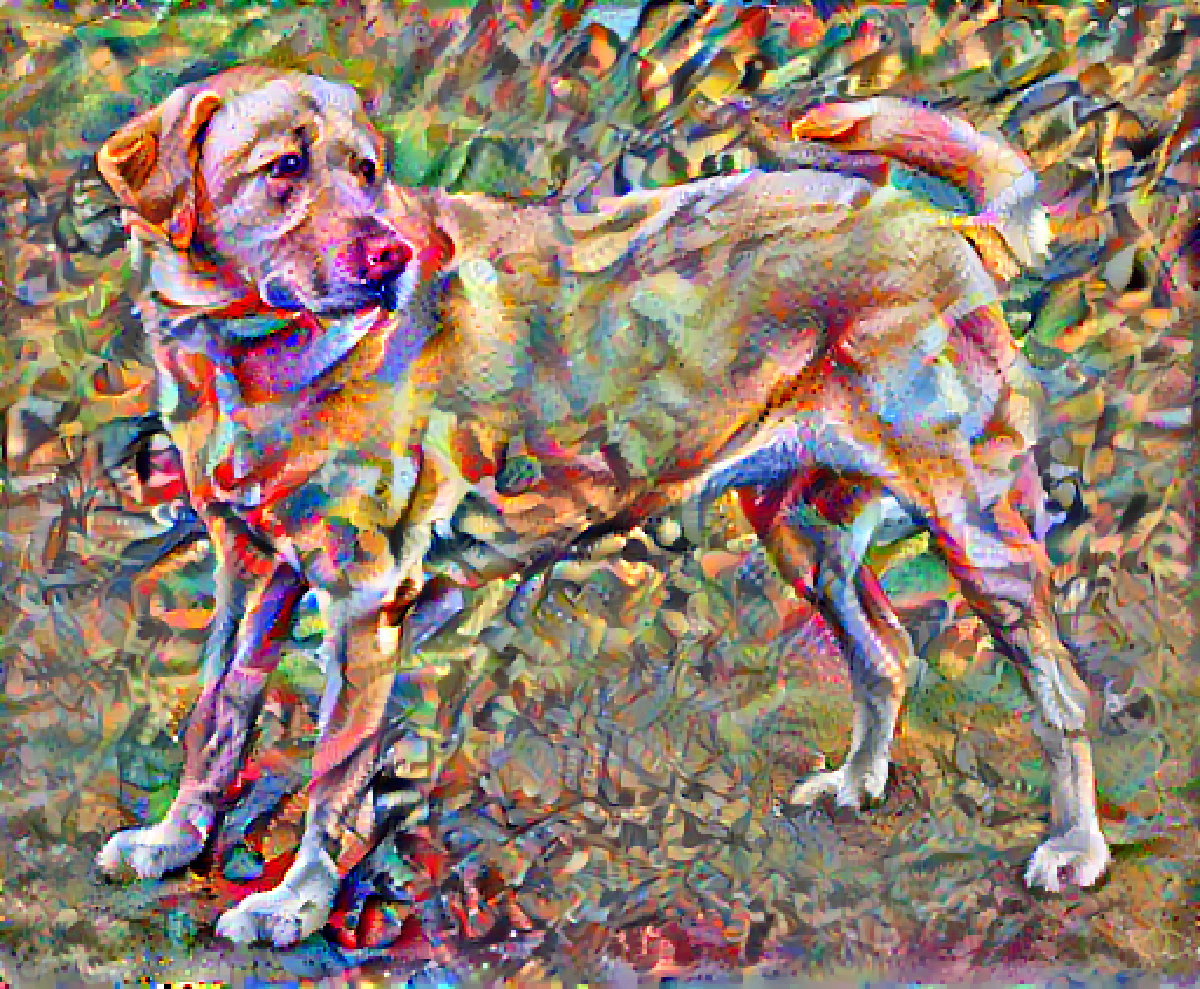
本教程使用 TensorFlow 和预训练的 VGG19 网络,实现神经风格迁移(Neural Style Transfer, NST)。通过分离图片的内容特征和风格特征,将一张风格图的艺术风格迁移到一张内容图上,生成具有特定艺术风格的新图片。
1. 环境准备 #
导入所需的库:
import tensorflow as tf
import os
import IPython.display as display
import matplotlib.pyplot as plt
import matplotlib as mpl
import numpy as np
import PIL.Image
import time
import functools

# 确保从 TensorFlow Hub 加载压缩模型
os.environ['TFHUB_MODEL_LOAD_FORMAT'] = 'COMPRESSED'

mpl.rcParams['axes.grid'] = False
2. 数据集下载 #
设置工作目录:
!test ! -d /content/NST && mkdir /content/NST
%cd /content/NST/content/NST下载内容图(一只黄色拉布拉多犬)和风格图(康定斯基的抽象画):
content_path = tf.keras.utils.get_file(
    'YellowLabradorLooking_new.jpg',
    'https://storage.googleapis.com/download.tensorflow.org/example_images/YellowLabradorLooking_new.jpg'
)
style_path = tf.keras.utils.get_file(
    'kandinsky5.jpg',
    'https://storage.googleapis.com/download.tensorflow.org/example_images/Vassily_Kandinsky%2C_1913_-_Composition_7.jpg'
)
Downloading data from https://storage.googleapis.com/download.tensorflow.org/example_images/YellowLabradorLooking_new.jpg
83281/83281 ━━━━━━━━━━━━━━━━━━━━ 0s 3us/step
Downloading data from https://storage.googleapis.com/download.tensorflow.org/example_images/Vassily_Kandinsky%2C_1913_-_Composition_7.jpg
195196/195196 ━━━━━━━━━━━━━━━━━━━━ 1s 3us/step3. 图像预处理 #
3.1 Tensor 转图像 #
def tensor_to_image(tensor):
    tensor = tensor * 255
    tensor = np.array(tensor, dtype=np.uint8)
    if np.ndim(tensor) > 3:
        assert tensor.shape[0] == 1
        tensor = tensor[0]
    return PIL.Image.fromarray(tensor)
3.2 图像加载与缩放 #
将图片最长边缩放到 512 像素,保持宽高比,并添加 batch 维度:
def load_img(path):
    max_dim = 512
    img = tf.io.read_file(path)
    img = tf.image.decode_image(img, channels=3)
    img = tf.image.convert_image_dtype(img, tf.float32)

    shape = tf.cast(tf.shape(img)[:-1], tf.float32)
    long_dim = max(shape)
    scale = max_dim / long_dim
    new_shape = tf.cast(shape * scale, tf.int32)

    img = tf.image.resize(img, new_shape)
    img = img[tf.newaxis, :]
    return img
3.3 辅助显示函数 #
def imshow(img, title=None):
    if len(img.shape) > 3:
        img = tf.squeeze(img, axis=0)
    plt.axis('off')
    plt.imshow(img)
    if title:
        plt.title(title)
加载内容图和风格图:
content_img = load_img(content_path)
style_img = load_img(style_path)

plt.subplot(1, 2, 1)
imshow(content_img, 'Content Image')

plt.subplot(1, 2, 2)
imshow(style_img, 'Style Image')
<Figure size 640x480 with 2 Axes>左图为内容图(拉布拉多犬),右图为风格图(康定斯基抽象画)。
4. 构建 VGG19 特征提取器 #
NST 的核心思想是利用预训练 VGG19 网络不同层的输出来分别表示内容和风格。
4.1 提取中间层输出 #
def vgg_layers(layer_names):
    vgg = tf.keras.applications.VGG19(include_top=False, weights='imagenet')
    vgg.trainable = False  # 冻结 VGG,不参与训练

    outputs = [vgg.get_layer(name).output for name in layer_names]
    model = tf.keras.Model([vgg.input], outputs)
    return model
4.2 Gram 矩阵 — 风格表示 #
风格由特征图之间的相关性定义。Gram 矩阵计算特征通道间的内积,捕获纹理、颜色分布等风格信息:
def gram_matrix(input_tensor):
    result = tf.linalg.einsum('bijc,bijd->bcd', input_tensor, input_tensor)
    input_shape = tf.shape(input_tensor)
    num_locations = tf.cast(input_shape[1] * input_shape[2], tf.float32)
    return result / num_locations
4.3 内容-风格模型 #
将 VGG19 的中间层输出封装成一个 Keras Model,分别提取风格层和内容层的特征:
class StyleContentModel(tf.keras.models.Model):
    def __init__(self, style_layers, content_layers):
        super(StyleContentModel, self).__init__()
        self.vgg = vgg_layers(style_layers + content_layers)
        self.style_layers = style_layers
        self.content_layers = content_layers
        self.num_style_layers = len(style_layers)
        self.vgg.trainable = False

    def call(self, inputs):
        inputs = inputs * 255.0
        preprocessed_input = tf.keras.applications.vgg19.preprocess_input(inputs)
        outputs = self.vgg(preprocessed_input)
        style_outputs, content_outputs = (
            outputs[:self.num_style_layers],
            outputs[self.num_style_layers:],
        )

        style_outputs = [gram_matrix(style_output) for style_output in style_outputs]

        content_dict = {
            content_name: value
            for content_name, value in zip(self.content_layers, content_outputs)
        }
        style_dict = {
            style_name: value
            for style_name, value in zip(self.style_layers, style_outputs)
        }

        return {'content': content_dict, 'style': style_dict}
4.4 选择特征层 #
style_layers = [
    'block1_conv1',
    'block2_conv1',
    'block3_conv1',
    'block4_conv1',
    'block5_conv1',
]
content_layers = ['block5_conv2']

num_style_layers = len(style_layers)
num_content_layers = len(content_layers)

extractor = StyleContentModel(style_layers, content_layers)

style_targets = extractor(style_img)['style']
content_targets = extractor(content_img)['content']
- 风格层:使用 5 个浅层到深层的特征图,捕获全局风格信息
- 内容层:使用
block5_conv2,保留高层次内容结构
5. 损失函数 #
5.1 风格损失与内容损失 #
- 内容损失:生成图与内容图在内容层输出的 MSE
- 风格损失:生成图与风格图在风格层 Gram 矩阵的 MSE
style_weight = 1e-2
content_weight = 1e4


def style_content_loss(outputs):
    style_outputs = outputs['style']
    content_outputs = outputs['content']

    style_loss = tf.add_n([
        tf.reduce_mean((style_outputs[name] - style_targets[name]) ** 2)
        for name in style_outputs.keys()
    ])
    style_loss *= style_weight / num_style_layers

    content_loss = tf.add_n([
        tf.reduce_mean((content_outputs[name] - content_targets[name]) ** 2)
        for name in content_outputs.keys()
    ])
    content_loss *= content_weight / num_content_layers

    return style_loss + content_loss
5.2 总变差损失(平滑正则化) #
加入总变差(Total Variation)损失抑制噪声,使输出图像更平滑:
total_variation_weight = 306. 优化器与训练步骤 #
使用 Adam 优化器,直接优化输入图像的像素值:
optimizer = tf.keras.optimizers.Adam(learning_rate=0.02, beta_1=0.99, epsilon=1e-1)


@tf.function()
def train_step(img):
    with tf.GradientTape() as tape:
        outputs = extractor(img)
        loss = style_content_loss(outputs)
        loss += total_variation_weight * tf.image.total_variation(img)

    grad = tape.gradient(loss, img)
    optimizer.apply_gradients([(grad, img)])
    img.assign(tf.clip_by_value(img, clip_value_min=0.0, clip_value_max=1.0))
每次梯度更新后,将像素值裁剪到 [0, 1] 范围内,确保生成图像合法。
7. 训练验证 #
以内容图作为初始值开始优化,逐步迁移风格:
start_time = time.time()

epochs = 10
steps_per_epoch = 100

img = tf.Variable(content_img)

step = 0
for n in range(epochs):
    for m in range(steps_per_epoch):
        step += 1
        train_step(img)
        print(". ", end="", flush=True)
    display.clear_output(wait=True)
    display.display(tensor_to_image(img))
    print(f'Train step: {step}')

end_time = time.time()
print("Total time: {:.1f}".format(end_time - start_time))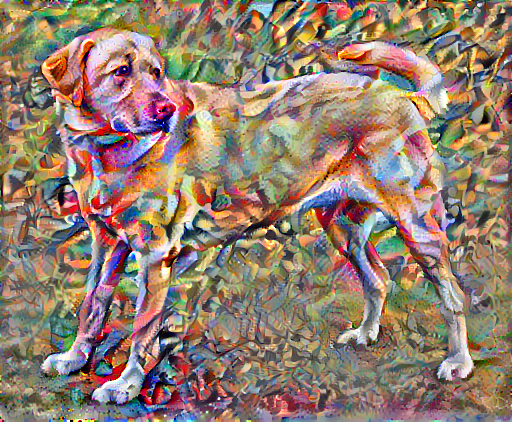
Train step: 1000
Total time: 81.8
共训练 10 个 epoch(1000 步),耗时约 82 秒(GPU 加速)。每一步生成图的内容结构和风格纹理都会逐渐逼近目标。
8. 总结 #
| 项目 | 说明 |
|---|---|
| 模型 | VGG19(ImageNet 预训练,冻结权重) |
| 内容图 | 黄色拉布拉多犬(512 像素最长边) |
| 风格图 | 康定斯基抽象画 Composition 7 |
| 内容层 | block5_conv2 |
| 风格层 | block1~5_conv1(5 层) |
| 损失函数 | 内容 MSE + 风格 Gram MSE + 总变差正则化 |
| 优化器 | Adam(lr=0.02, beta_1=0.99, epsilon=1e-1) |
| 训练步数 | 1000 步(10 epochs × 100 steps) |
| 训练耗时 | ~82 秒 |
本教程基于 Gatys et al. (2016) 的经典 NST 方法,通过预训练 VGG19 分离图像的内容与风格特征,利用梯度下降直接优化像素,实现任意风格图到内容图的艺术风格迁移。